Can You Make Caramel Sauce With Milk Instead of Cream?

FACT: Caramel sauce is delicious. Caramel sauce is dreamy, and filled with cream. But wait. Can you make creamy caramel sauce when you're all out of cream? The answer is yes: it's possible to make caramel sauce with milk instead of cream, and I want to tell you how. 

But before I do that, I feel that I should offer a small education on the unusual process that is making caramel, because it is full of moments when your mixture looks WRONG, and I want to tell you about them and why you're actually doing things right.

These are some hard-earned tidbits I have picked up from experience. These hold true whether you're using cream OR milk.

1: A sturdy, heavy-bottomed saucepan with tall sides is your best bet.

You'll see that I didn't quite follow my own advice in the photo tutorial, but I am pretty accustomed to making this sauce so I have learned how to do it. If you have never made caramel, you'll be happy for the tall sides on a pot, because of the next thing:

2: When you add the milk to the sugar, the reaction can be scary.

The basic process of making caramel sauce is this: you'll melt some sugar, then you'll incorporate milk, then cook until thickened. 

But here's the thing: when you add the liquid to the hot sugar, it's going to have a firecracker of a reaction: it's going to bubble, it's going to hiss, it's going to seem like something is very wrong. Guess what? It's totally normal. You just want those high walls on the pot so that when it gets bubbly and scary, it doesn't make a big mess on your stovetop.

3: When you add the milk to the sugar, weird, hardened bits of sugar will form.

In addition to the crazy reaction, bits of sugar will solidify and look like ruined lumps and bumps when you add the liquid. Some of them, as you can see above, are really quite scary and wrong-looking. Guess what? Also this is normal. By continuing to cook the liquid, those bits will dissolve gradually. Even that monster-lump above! 

4: It's not hard to make caramel sauce, but it requires your full attention.

Making caramel sauce isn't hard, but please give it your undivided attention. It's worth it in the end, because you'll have a smooth, delicious caramel, and won't have any scorched pans to have to deal with later.

OK, now that you've read these cautions, let me tell you how to make caramel with milk instead of cream! 

Note: this is a salted caramel sauce. If you're the single person in the world who does not love salt and caramel, you can omit the salt. 

Caramel sauce with milk 

Printable version here

Makes about 1 3/4 cups 

  • 2 cups sugar 
  • 1 3/4 cups milk (I used whole milk)
  • 1 teaspoon vanilla
  • 1/2 teaspoon salt

Pour the sugar into your large pot. Shift the pot side to side to distribute the sugar evenly.

Put the pot over medium-low heat. Stay nearby, but don't stir or shift the sugar. This is a slow, gentle heating, and nothing visual will really happen for a few minutes. Concurrently, you can combine the milk and the vanilla in a heatproof measuring cup, and heat the mixture in the microwave for about 1 minute (this will help lessen the reaction when the liquid hits the hot sugar in a bit). 

After several minutes (it was about 8 minutes for me), you'll see the sugar beginning to liquefy. At this point, use a heatproof rubber spatula to turn the mixture over on itself, moistening the still-dry portions of sugar. 

Continue heating. As the sugar warms, it will begin to darken in color, first to a sort of beige and then to a light caramel tone. When the sugar has reached a rich caramel tone, medium-brown but not dark, remove from heat. Now, be ready for some hissing and bubbling as you pour about 1/3 to 1/2 of the milk mixture into the caramel mixture. It will hiss, it may bubble, hardened bits may form, but it shouldn't bubble over the sides of the pot. Once the bubbling has subsided, add the rest of the milk mixture, and return the pot to the burner, and put it on medium-low heat. Remember: those hardened bits = totally normal.

Stir constantly as the mixture cooks. You'll see that the hardened bits begin to shrink and then dissolve. Once they are mostly dissolved, stir in the salt.

Cook for about 10 minutes for a thinner caramel sauce, 15-20 minutes for a thicker sauce. Remove from heat when the mixture is about 20% short of how thick you'd like it, because it will thicken more as it cools. If it seems at all lumpy, strain it through a fine mesh strainer. 

Transfer the mixture to a heatproof container to cool. Store leftovers in the fridge in jars. Enjoy on EVERYTHING. 

Do you like caramel sauce?

Magical Unicorn Cookies

OMG! My friend Joanne had a baby, and a few of us bloggers are celebrating. I brought unicorns to the party. Unicorn cookies, that is.

You might think that since she had a baby boy, I should go all blue, but I disagree, because I think that unicorns and magic transcend gender. And any boy who can embrace a sprinkled pink unicorn is a boy I'd like in my life. 

Best of all, these cookies are easy to make. It's actually an adaptation of the DIY animal crackers from my second book, The Secret Lives of Baked Goods, but with a magical upgrade: pink icing and plenty of sprinkles. 

BTW, I couldn't find a unicorn cutter and my existing one is in a different city right now, so I went and bought a pony-shaped one.

It was easy to affix horns by hand. So if you can't find a unicorn cutter, buy a pony cutter. Just don't let any un-horned ponies get cornered by unicorns. 

OK, I know you're getting eager to make these babies, so let me help you. 

Scroll to the bottom of the post for the recipe; meantime, directly below you'll find the links to other blogger creations inspired by Joanne, and check out the hashtag #fifteenspatulasbaby to follow the posts and story!

Appetizers

Italian Sub Sandwich Roll-ups from Michael of Inspired by Charm

Smoky Roasted Red Pepper Sun Dried Tomato Hummus from Jeanette of Jeanette’s Healthy Living

Creamy Sweet Potato Soup from Sadie of Dairy Good Life

Whipped Goat Cheese & Blueberry Balsamic Crostini from Meseidy of The Noshery

Rosemary Flatbread with Baked Goat Cheese from Heidi of FoodieCrush

Spring Herb Cream Cheese Appetizer Cups from Rachel of Rachel Cooks

Crostini with Almond Ricotta and spicy olive tapenade from Heather of HeatherChristo

Drinks

Fruit Freeze from Deborah of Taste and Tell

Mint Lemonade from Trish of Mom On Timeout

Ginger Lemonade from Kathy of Panini Happy

Desserts

Chocolate-Covered Rice Krispies Treats from Julie of The Little Kitchen

Orange Fluff from Jamie of My Baking Addiction

Peanut Butter Pretzel Brownies from Susannah of Feast + West

Mini Ombre Heart Cookies from Bridget of Bake at 350

Mini Coconut Pound Cakes from Mary of Barefeet In The Kitchen

Yellow Sheet Cake with Chocolate Sour Cream Frosting from Jennifer of Savory Simple

Unicorn Shaped Cookies from Jessie of CakeSpy

Oreo Cheesecake Bites from Brenda of a farmgirl’s dabbles

Lemon Blueberry Bread from Glory of Glorious Treats

Blintz with Blackberry Sauce from Sommer of A Spicy Perspective

Pastel Rainbow Cake from Bree of Baked Bree

Individual Chocolate Souffles from Andie of Andie Mitchell


MAGICAL UNICORN COOKIES 

Makes about 30 (Printable version here)

Ingredients

  • 2 1⁄2 cups all-purpose flour
  • 1⁄4 teaspoon salt
  • 1 teaspoon baking powder
  • 1⁄8 teaspoon cinnamon
  • 3⁄4 cup (1 1⁄2 sticks) unsalted butter, softened to cool room temperature
  • 1 cup sugar
  • 1 egg
  • 1 1⁄2 teaspoons vanilla extract

Icing

  • 2 1/2 cups confectioners' sugar
  • 3-5 tablespoons cream
  • pink (or red) food coloring
  • LOTS AND LOTS OF SPRINKLES

Procedure

  1. In a medium bowl, stir together the flour, baking powder, salt, and cinnamon. Set aside.
  2. In the bowl of a stand mixer fitted with the paddle attachment, cream the butter and sugar on medium speed until light and fluffy, 3 to 5 minutes. Add the egg and vanilla, stirring until combined.
  3. Add the flour mixture in 3 additions, mixing after each addition just until incorporated. Scrape down the sides of the bowl as needed.
  4. Form the dough into 2 disks and wrap well with plastic; refrigerate for at least 2 hours or overnight. Chilling the dough will ensure that the shapes hold once cut out and that the dough will not spread too much during baking.
  5. Preheat the oven to 350 degrees F. Line 2 baking sheets with parchment paper and set aside.
  6. Allow the cookie dough to warm slightly at room temperature before rolling it. On a floured work surface, use a floured rolling pin to roll the dough to about 1⁄4 inch thick. Use your unicorn or pony cutter to cut out as many cookies as you can; re-roll scraps to get more cookies from the dough.
  7. Let the cookies chill (on the baking sheets) in the refrigerator for 30 minutes before baking. This will ensure that they retain a crisp shape.
  8. Bake for 9 to 10 minutes, rotating at the 5 minute mark, or until firm, just lightly brown on the edges, and with a dull finish on top. Let cool on the pan for several minutes, then transfer to a wire rack to cool completely.
  9. Mix the confectioners' sugar with cream until it reaches a thick but spreadable consistency. Stir in the food coloring. Working with one cookie at a time, spread the icing on top, and then add the sprinkles right away (they'll stick best right after the cookies are iced).

CONGRATULATIONS, JOANNE!

Greek Yogurt Chocolate Chip Chia Seed Cookies

It is in the name of honesty that I divulge this shameful fact: I don't like yogurt as a stand-alone food.

This may be an unconventional way to set up a recipe post sponsored by Greek Gods Yogurt, so let me explain. I love yogurt as a COMPONENT of other foods. Or combined with other foods. Especially Greek yogurt, which I will use for any and everything from a mayo substitute to a topping for baked potatoes. 

Here's the thing: I have discovered that I do like baking with yogurt. In fact, I love baking with yogurt.

Yogurt--Greek yogurt in particular--lends a tangy, buttermilk-like flavor to baked goods, and an incredibly fluffy texture. I am guessing the texture has something to do with the fact that the acidic component of yogurt acts in tandem with any leaveners to create fluff city, but I am no scientist, so that is only a theory. 

OK, so with all that having been said, I need to tell you that when Greek Gods was all, "let us send you some of our chia seed Greek yogurt to bake with!", I was all (please imagine me saying this in Justin Timberlake's voice) "yeah girl, let me see what I can bake up with your chia seed goo". 

As long as there are no follow up questions, that is exactly how it happened.

So, a few days later the yogurt arrived, and I got baking. I love healthy-ish cookies (you know, the kinds with oats and whole wheat flour, but still plenty of butter and sugar), so I was really psyched about a riff on chocolate chip cookies using this yogurt.

I thought it made a great #whathappenswednesday concept, too: what happens when you make chocolate chip cookies with Greek yogurt?

These cookies came out awesomely! 

As I had previously experienced, the yogurt gave the cookies an amazingly fluffy texture. The chia seeds were subtle, but definitely present, adding a little bit of an earthy flavor and tiny bit of texture. With a bunch of oats and some very good quality chopped chocolate thrown in the batter, these were definitely not your typical chocolate chip cookies, but turned out to be 100% crave-worthy.

I brought some to the yoga studio where I teach, I brought some to a fellow yoga instructor's birthday party, and the rest my sweetheart ate. They all disappeared, nobody declared them too healthy, everyone remarked on the fluffy texture.

These cookies are well worth a try if you want to add a little health to your cookie but, you know, still have a cookie, or if you just want to try something new, or if, like me, this is a way that you can enjoy yogurt. And if you love yogurt, go ahead and dip these cookies in it for added bliss. 

Greek Yogurt Chocolate Chip Chia Seed Cookies

Printable version here

  • 1 1/4 cups all purpose flour
  • 1 cup whole wheat flour
  • 1 teaspoon baking soda
  • 1 teaspoon salt (I like salty; use less, like 1/8 to 1/4 tsp if you don't)
  • 1/2 cup, or 1 stick, unsalted butter, softened 
  • 3/4 cup dark brown sugar, packed
  • 3/4 cup granulated sugar
  • 2 large eggs, room temperature
  • 1 teaspoon vanilla extract
  • 1 container (150g) Greek Gods Vanilla Chia Seed Yogurt
  • 2 cups good quality semi or bittersweet chocolate, chopped; or, use chocolate morsels 
  • 1/4 cup rolled oats 
  1. In a large-ish bowl, sift together the flour(s), baking soda, and salt. Set to the side.
  2. In a stand mixer fitted with the paddle attachment, cream the butter on medium-high speed, until soft and malleable-looking. Add in the two types of sugar, and continue creaming for 2-3 minutes, or until nice and fluffy. 
  3. Add in the eggs, one at a time, mixing completely and scraping down the sides of the bowl with a rubber spatula as needed.
  4. Stir in the vanilla and the Greek yogurt, mixing on low speed to combine. Scrape the sides of the bowl as needed. The dough will become very gooey at this point.
  5. Add the flour mixture, mixing on low speed to combine. Once completely cohesive, fold in the chocolate and the oats, stirring to ensure even distribution. 
  6. Remove the bowl from the mixer, cover with plastic, and put the bowl in the refrigerator for at least 2 hours, or (even better) overnight. This is very important as it discourages the cookies from spreading too much, as well as allowing the flavors to come together.
  7. Near the end of your cooling period, preheat the oven to 375 degrees F.
  8. Line two baking sheets with parchment or silicone liners. Scoop rounded tablespoons of dough on to the prepared sheets, leaving plenty of room around each cookie to allow for spreading. (I did 12 cookies per sheet). 
  9. Bake in the preheated oven for 10-12 minutes, or until golden and "set" on top, rotating the pans at the 5 minute mark. Remove from the oven, let cool on the sheets for a couple of minutes, then transfer to wire racks to cool completely. 
  10. Repeat baking until you've used all the dough. I made about 40 cookies from this batch. 
  11. Store leftovers, well wrapped, at room temperature, for up to 5 days. 

Have you ever made cookies with yogurt?

An Easy and Inexpensive Substitute for Mascarpone Cheese

There are a few good reasons why you might want to make a mascarpone cheese substitute.

One is availability. Mascarpone isn't what I would call a rare ingredient, but it can prove tricky to find depending on where you are and what your local market stocks. Even within a grocery store it can be tricky to locate: is it near the fresh pasta, or near the cream cheese? It can take some effort to track it down.

Another is price. When recently developing a recipe that called for mascarpone cheese, I had to fork over $6.99 per container of the stuff. Not too bad for a one-time deal, but when testing recipes, you have to buy 3-4 batches' worth sometimes. That starts to add up! 

So, I thought it might be valuable to offer an alternative to mascarpone cheese. If I do say so myself, I think I have done a very good job here. 

I looked up recipes online to start, but ultimately decided on my own configuration. Butter and cream cheese give this mascarpone substitute a rich flavor and texture, and a touch of lemon (or lime, depending on what the final recipe you're using this for and your taste) helps add to the natural tang of cream cheese; a touch of salt brings out all of the flavors, and a little cream gives it a texture similar to mascarpone.

This can be substituted in equal quantities for mascarpone cheese in your favorite recipe, with delicious results. It doesn't taste identical but in a recipe with other ingredients, it really does come pretty close. 

Mascarpone cheese substitute

Makes a little over 1 cup 

Printable version here

  • 1 brick (8 ounces) full fat cream cheese, room temperature
  • 2 tablespoons unsalted butter, softened to room temperature
  • 1/4 teaspoon lemon or lime juice
  • 1/4 cup heavy cream
  • pinch salt

Mix together the cream cheese, butter, and lemon juice, mixing very completely. Like, start mixing and walk away for 10 minutes thorough mixing (this is literally what I did). 

Add the salt and heavy cream, and mix until creamy and cohesive. Transfer to a bowl, cover, and store in the refrigerator until ready to use. 

Substitute for mascarpone in your favorite recipe! 

Have you ever made an interesting DIY substitute?

The Best Vanilla Cupcakes, According to Me

I know that recipes are titled the best this and the best that all the time. But unlike those other liars I mean it! (I am kidding, mostly)

I don't want to make unrealistic promises. This recipe is not going to revolutionize the way that cake tastes or the way that you eat it. It isn't a NEW flavor of cake. But if you're looking for a solid, reliable, perfectly fluffy and flavorful every time vanilla cupcake recipe? HERE YOU GO. IT IS PERFECT. 

This is my go-to classic birthday cake recipe, in cupcake form. The key to its success is in the mixing. Mixing the egg yolks and whites separately, then adding the egg whites in to the batter at the last minute, creates a beautiful fluffy yet rich cake. Using a little brown sugar doesn't hurt, adding a slight caramelly note to the cupcakes.

These cakes work well with just about any type of frosting you could imagine, from a rich Baci buttercream to a pretty in pink cherry morsel buttercream to my personal favorite classic buttercream

I hope you enjoy this recipe - it's a keeper! 

My favorite vanilla cupcakes (and therefore the best)

Printable recipe here

  • 2 1/4 cups sifted cake flour

  • 2 teaspoons baking powder

  • 1/2 teaspoon salt

  • 4 large eggs, separated

  • 1 cup (2 sticks) unsalted butter, softened

  • 1 1/2 cups granulated sugar

  • 1/2 cup brown sugar

  • 2 teaspoons vanilla extract

  • 1 cup buttermilk

  1. Adjust an oven rack in the middle position; preheat the oven to 350 F. Line two 12-cup cupcake tins with cupcake liners.

  2. In a large bowl, sift together the flour, baking powder and salt. Set to the side.

  3. In the bowl of a stand mixer fitted with the whisk attachment, whisk the egg whites until soft peaks form. Transfer the mixture to a bowl for the moment, and set to the side.

  4. Fit your stand mixer with the paddle attachment or a rotary beater. In the bowl (it’s fine to use the same bowl you just used for the egg whites; no need to wash), cream the butter until fluffy and light, 2-3 minutes on medium-high speed.

  5. Add the sugar(s), and mix until combined and smooth, about another 2 minutes on medium-high speed. Add the egg yolks, one at a time, stirring after each addition and scraping the sides of the bowl as needed with a rubber spatula. Stir in the vanilla.

  6. Add the buttermilk and flour mixtures alternately, in 2-3 additions each. Mix until the batter is smooth and lump-free, scraping the sides of the bowl with a rubber spatula as needed. The batter will be fairly thick.

  7. By hand, fold the egg whites into the batter, stirring gently and only until no streaks of white remain.

  8. Fill each cupcake liner about ⅔ full; do not overfill, as the batter may bubble over the sides.

  9. Place the cupcake tins in the preheated oven. Bake for 17-20 minutes, rotating the pans at the 10 minute mark to ensure even baking. To test for doneness, you can insert a toothpick or cake tester in the center of a cupcake; it should come out mostly clean.

  10. Remove the tins from the oven, and place on wire racks to cool completely.

Frost them however you'd like! My suggestions: 

CakeSpy's favorite buttercream

Baci buttercream (as seen in this recipe

Do you have a go-to vanilla cupcake recipe?

Perfect for Easter: Homemade Chocolate Peanut Butter "Eggs"

Let's talk about chocolate peanut butter eggs. Let it be stated from the very beginning that I love the things.

I remember when Reese's debuted their peanut butter eggs. It was a red-letter day--no, year!--for me. Finally, a chocolate and peanut butter confection with a better chocolate (slightly less) to peanut butter (slightly more) ratio. I always felt like I wanted more peanut butter in my cups, and this new formation seemed to address that issue. Unfortunately, they were only in stores around Easter.

Now, Reese's repackages seasonal variations so that you can basically get the higher-ratio-peanut butter treats all year round--there are Christmas and Halloween varieties, and basically those show up in stores like a month after Easter, right?

But I need to tell you that in spite of nearly year-round availability, you should still learn how to make your own chocolate peanut butter eggs. Why?

1. They are better for you. The list of ingredients is not as scary as the Reese's ones. Don't get me wrong, I will eat them, but I won't necessarily be proud of myself for doing so. The homemade ones, I can be proud of eating.

2. They taste better. It's just a fact: you can use better quality ingredients if you make your own choco-pb eggs. I used Peanut Butter and Company peanut butter, and Perugina chocolate, and you can taste the difference with the better ingredients. 

3. You can make them as salty as you wanna. I am obsessed with salt, and I like to add extra salt to basically everything, from chocolate cake to avocado slices to buttered bread. I like to add an extra dash of salt to both the filling and the coating.

4. They are fun to make and people will like them. People will be impressed when you tell them you made a homemade version of a commercial treat. It's a fun way to get people to like you even more.

OK! I think I've made a good case. Make your own chocolate peanut butter eggs!

RECIPE HERE.

A Great Cake Recipe for Sculpting

It's National Pound Cake Day! Did you know that pound cakes are one of the best types of cake for sculpting?

By "sculpting" I mean cakes that can be sculpted into cake decorating masterpieces by the pros in big cities who make wedding cakes for the stars. You know what I mean.

Recently, I came up with a pound cake-esque recipe for Craftsy which was specifically designed with sculpting in mind. This firm, tender-crumbed cake is 100% perfect for sculpting, and tastes great.

It's a great way to get creative on National Pound Cake Day and make something beautiful!

Recipe here.

February 25: Chocolate Covered Salted Cashews for National Chocolate Covered Nut Day

Sometimes you feel like eating all of the chocolate in the world. But other days, you just need a snack. Today being National Chocolate Covered Nut Day, I'd like to introduce you to one of my favorite snacks: small-batch chocolate covered salted cashews. 

Chocolate covered nuts are in fact a great snack, because they have enough nut that you can call them health food but enough chocolate so that they are pleasurable. 

My favorite nut to coat in chocolate is cashews. This is for a few reasons. I'll tell you a few of them right now:

1. You often see commercial confections featuring chocolate and almonds or peanuts. I've never seen a candy bar or commercial treat featuring cashews, have you?

2. If you go to a confectionery shop, you'll probably see chocolate-almond bark, you'll probably see pecan turtles, but rarely will you see a chocolate cashew treat. 

3. If you go to a bakery and they offer brownies with nuts, chances are the nuts in question are pecans or walnuts. I've never seen a cashew brownie at a bakery. 

What I am getting at here is that chocolate-cashew is for some reason not an exceedingly popular flavor combo. I don't really see why, because there is so much to love about the combo: the mellow, creamy-buttery cashew flavor is the perfect complement to chocolate. I prefer cashews with milk chocolate because it makes the flavor combo extra-creamy, and I prefer to use roasted/salted cashews, because I like a little crunch to the texture and I am basically addicted to salt. 

So, for National Chocolate Covered Nut Day, I'd like to make some chocolate covered cashews, and I'd like you to know how I do it so you can recreate the magic at home. 

This batch is perfectly sized to provide a few servings, but not such a huge batch that the nuts are going to go stale or the chocolate is going to get all weird and bloomed before you've devoured them. 


Small batch chocolate salted cashews

makes about 30

  • 2 ounces of milk or dark chocolate 
  • about 30 medium or large salted, roasted cashews 

Melt the chocolate. I like to do this in the microwave, in 20 second increments on high, until mostly melted. Give it a stir and any residual solid bits should melt into the mixture.

Toss 3-4 cashews in at a time, and turn them to coat, using a fork. Using the same fork, remove, let excess chocolate drip off, and place on a sheet of parchment or silicone to completely "set".

Store in a single layer to prevent the cashews from melting into one another, or if you don't care about that, just put them in a bag. 

Enjoy!

February 24: National Tortilla Chip Day, and a Pancake Experiment

Today is National Tortilla Chip Day. Now, don't get me wrong. I have nothing agains tortilla chips. I've even created tasty desserts with them. But I have a different carb on my radar today: PANCAKES. 

You see, a few weeks ago Krusteaz sent me a whopping box full of every sort of breakfast boxed mix, including Belgian waffles, blueberry muffins, and plain buttermilk and blueberry pancakes. They sent it to me because February is Hot Breakfast Month (did you know?) and they want to promote the idea of breakfast all day, including for dinner. They asked, in return, that I tell you about this coupon. Well, I've done it. You might want to use it after you see what I did with their mix. 

As readers of this site well know, a boxed mix to me is like a written experiment to conduct a culinary experiment. So while I looked over my box of goodies, I found myself wondering one thing above all:

What would happen if I mixed up a batch of pancakes, but instead of cooking them on the griddle, baked them into one big pancake in a pie plate? 

Well, let me tell you, the oven was set to preheat to 350 (I just stuck with a moderate temperature) within the minute, and I hastened to grab and grease a pie plate.

I prepped the blueberry pancake mix per the instructions, which I can summarize in two easy words for you: ADD WATER.

A batch of 6-7 servings was 1 cup of mix plus 2/3 cup of cold water; figuring a pie plate typically has 8 or so servings, I upped the quantities slightly, using 1 1/2 cups of mix and 1 full cup of cold water. 

I poured the mixture into the prepared pie plate...

and let it bake. I started out at 15 minutes; at that mark, the edges were golden but the center was still light. I let it bake for 2 more minutes, but at that point I took the pancake out because I didn't want the edges to dry out, and the top did look cooked through. 

I took that baby out of the oven, and here's what it looked like: 

I let some butter melt on top, and garnished with a strawberry. Oddly I had no syrup in the house, but as my mamma taught me, a good pancake really doesn't need syrup; it should be able to stand on its own. So how would this one stand up? 

Since there are no rules about how to cut a large pancake baked in a pie plate, I bravely forged my own path and decided to serve it in wedges. It sliced nice and cleanly. Nice, toasty edges, but soft in the center.

The texture was fluffy and perfectly done. I dug in with my fingers, because A) I am a LADY, and B) the closest fork was a marathon 20 feet away. 

Well, I'll be. This worked pretty darned well! The texture was very fluffy. While the finished creation looked cake-like, it definitely still had the soul of a pancake. It was a fun and novel way to serve them, and the mix tasted just fine without syrup, I think. 

This experiment got my mind going in so many directions.  You could doctor the mix up with add-ins like chocolate chips, nuts, or banana slices; or, what if you baked up two large pancake rounds and stacked them with a maple buttercream for a sort of ultimate breakfast pancake cake?

Or, in keeping of the "Breakfast Night" theme, you could top this sweet pancake with eggs, sausage, and/or bacon for a savory delight.

Of course, you could just bake it up and serve hot little pancake wedges, like I did.

If you want to recreate this magic, here's how I did it!

Oven blueberry pancake 

  • 1 1/2 cups Krusteaz Blueberry Pancake Mix
  • 1 cup cold water 

Preheat your oven to 350 degrees F. Generously grease a pie plate.

  1. Mix the pancake mix and water together with a wooden spoon, only long enough to moisten.
  2. Pour the mixture into the prepared pan.
  3. Bake for 15-17 minutes, or until the edges are golden and the top has a matte finish (it may still be light in color).
  4. Remove from the oven, let cool slightly, and serve. 

Have you ever baked pancakes in the oven? 

February 23: National Banana Bread Day

So, today is National Banana Bread Day. I say you celebrate with something slightly better than banana bread--BANANA CAKE.

Forget you, banana bread! 

Hummingbird cake is a delicately-textured spiced banana cake. While it has characteristics of banana bread, its texture and sweetness bring it firmly into cake territory.

Traditionally, hummingbird cake is made with pecans and bits of pineapple. But recently, I did a little experiment where I substituted "pineapple" for "chocolate bar" and "pecans" for "hazelnuts" in the recipe.

Did it alter the finished flavor? Yes. Is it traditional? Not quite. But will you forgive me because of its insane deliciousness? I sure hope so. 

Chocolate-hazelnut hummingbird cake recipe here. 

February 18: National Crab-Stuffed Flounder Day and National Drink Wine Day

Well, well, well. Today just so happens to be National Crab-Stuffed Flounder Day. No, I wouldn't kid about such a thing. Luckily, it's also National Drink Wine Day. I think I'll stick with the latter. And to make wine really stand out, I know just how to enjoy it: with cake.

This is no ordinary cake. It just so happens to be a decadent flourless chocolate cake served with a red wine glaze. The red wine adds a pleasing acidity to the sweetness of the glaze, which works wonderfully with the extra-dark chocolate. So have your wine, and eat it, too! 

Here's the recipe for flourless chocolate cake with red wine glaze.

February 13: National Tortellini Day, and a Sky High Red Velvet Cake Recipe

Happy National Tortellini Day! Oh me oh my, how I love tortellini. Carbs and cheese. So much yes! But while I loved sharing that with you, I think I'm going to keep my focus for the post sweet today, since Valentine's Day is coming and I have made so many romantic and fantastic desserts lately. For instance, this sky-high red velvet cake.

Technically, I suppose it's two cakes: a red velvet cake, and a chocolate layer cake. But I've sandwiched them all together into a four-story sweet stack of frosted awesome to make this object of edible art. 

This would be an impressive cake to make for your valentine, don't you think?

Find the full recipe here. 

February 4: National Stuffed Mushroom Day

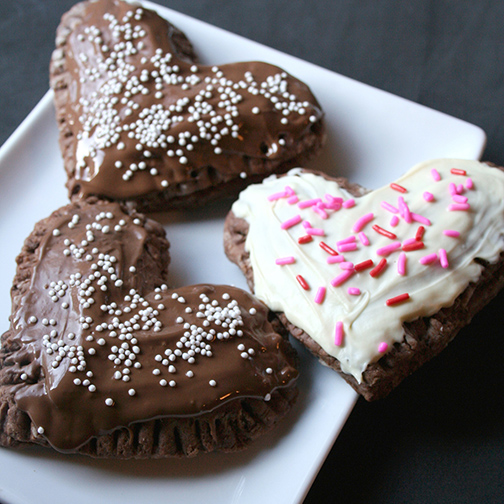
Don't get me wrong. I love a good stuffed mushroom. But National Stuffed Mushroom Day? Not so much on this site, sorry. It's also National Homemade Soup Day, BTW. That is also delicious, but not for this site. So why don't we cut to the chase and talk about homemade pop-tarts instead?

Well, technically they are pop-hearts, because as you can see they are heart shaped. But that's not the only thing that makes them special.

These homemade pop-tarts are also made using a unique pastry crust, made using olive oil instead of butter or shortening. It gives them a unique and sophisticate flavor--you've got to taste it to believe it. It's tender, not necessarily flaky, but tasty.

The pop-hearts are also filled with melted Baci chocolates. OMG! OMG! 

You've got to make these sweet treats for your valentine. Forget stuffed mushrooms! This is where the romance is at, people.

Full recipe here. 

January 31: National Brandy Alexander Day, and Italian Meringue Buttercream

Today is National Brandy Alexander Day. I have never tried a Brandy Alexander, and my only real experience with them is a long-running joke that a friend with Alexander as her last name should adopt the drink's name should she ever take up stripping. I know what you're thinking: HILARIOUS.

But I digress. I don't think today is the day for me to discover drinking Brandy Alexanders, so instead may I tempt you with another delectable delight that has nothing to do with alcohol? It's called...

Italian Meringue Buttercream.

For the longest time, this buttercream scared me. It involves monitoring temperatures and boiling sugar, both of which set off the "too hard!" blinking button in my mind when I read through a recipe.

But you know what? It's really not that hard. Really. And the stuff is delicious.

It's a little fancier and definitely smoother than an American buttercream (which is primarily butter and sugar). Using egg whites in buttercream, as you will do with Italian and Swiss meringue buttercreams, respectively, gives them a silkier finish and a more sophisticated flavor. Plus, they're a little more heat-resistant, so they're better for using on cakes that might be served during warmer or more humid weather. 

I wrote a little tutorial on how to make Italian Meringue buttercream on Craftsy.com. I think you should check it out, because I wrote it with newbies in mind.

Don't be scared of Italian meringue buttercream! Go ahead, have a Brandy Alexander, and give it a try.

Recipe and tutorial here.

Cake Mix With Beer for National Chocolate Cake Day.

This is a chocolate cake mix. And a beer. What happens when you bake them up together?

Well, it being that tomorrow (1/27) is National Chocolate Cake Day, and that I have been snow-bound in the house for the last few days, I decided to bring on #whathappenswednesday a little early to find out.

This type of experiment seems like a really good idea when you're stuck in the snow.

So I preheated the oven to 350, per the box instructions.

But instead of the requested added ingredients (1/4 cup oil; 1 cup water; 3 eggs) I altered it a little bit and added a bottle (12 ounces) of dark beer, 1/2 cup oil, and 2 eggs.

wetingredientscakebeer2016.jpg

I mixed it all up with a fork (that is a tip I got from my older sister; mixing cake mix with a fork is so much better than with a wooden spoon! Once the eggs are broken up and mixed, you can switch back to a wooden spoon). 

withfork.jpg

I decided to make it in a bundt pan because, well, I recently acquired a new one and there were instructions for bundt baking on the cake mix instructions.

I baked it for 39 minutes, which was the low end of what the mix suggested.

I have to say, it came out smelling--and looking--pretty darned good. 

But how did it taste?

This cake was unique. I was really glad I chose a chocolate cake mix to work with this dark, hoppy beer, because I think that if I had used, say, a yellow cake, the beer would have imparted a bitterness on the cake that would not have worked (probably a lighter beer would have worked with a lighter cake, though). However, I think chocolate is sturdy and robust enough to work with the bitterness of a dark beer, so that instead of being weird, it becomes complex. 

I ended up using the same ganache I used to top my chocolate cream filled bundt cake. 

All things considered: using beer in a cake mix works very well.

The flavor is definitely not for everyone (especially kids - not only because of the alcohol, but because the flavor is a little too complex) but it sure is interesting. I think that the dark, hoppy beer made it especially complex--perhaps a smoother stout beer would have worked better (I already know Guinness works great in cake!). But overall, if you love beer and you love chocolate cake, this is worth trying. 

If you want to try this, here's what you do:

  1. Grab a cake mix (for a regular layer cake, not a pound cake or anything out of the norm), and then grab a beer that you think will work, flavor-wise, with the flavor of the cake. No, I am not sure what beer pairs best with funfetti. 
  2. Ignore the additions called for in the recipe, and mix the powder with 1 twelve-ounce beer, 1/2 cup of oil, and 2 eggs.
  3. Bake for the time suggested on the box, and follow instructions for unmolding and cooling. Frost (of course) and enjoy!

Have you ever baked with beer?