I don't know about you, but I'm a sucker for a showoff cake.
By "showoff cake", I mean a cake which will make people jealous of your amazing kitchen prowess.
This cake, my friends, is an official showoff cake. It's from the cool new book Surprise Cakes by Marsha Janine Phipps.
In the book's overview, it says this:
"The impact of your cake--traditionally lost upon cutting - will go on to surprise your guests with hidden designs baked baked directly into the sponge, or through clever use of frostings or jam. With recipes, baking tips, and frostings, you'll be guided through the easy, step-by-step process from the very start of your project to the finish."
See? Exactly like I said. Cakes for showing off. Here's one of my favorite ones from the book, with permission from the publisher.
Hidden Passion Minicakes
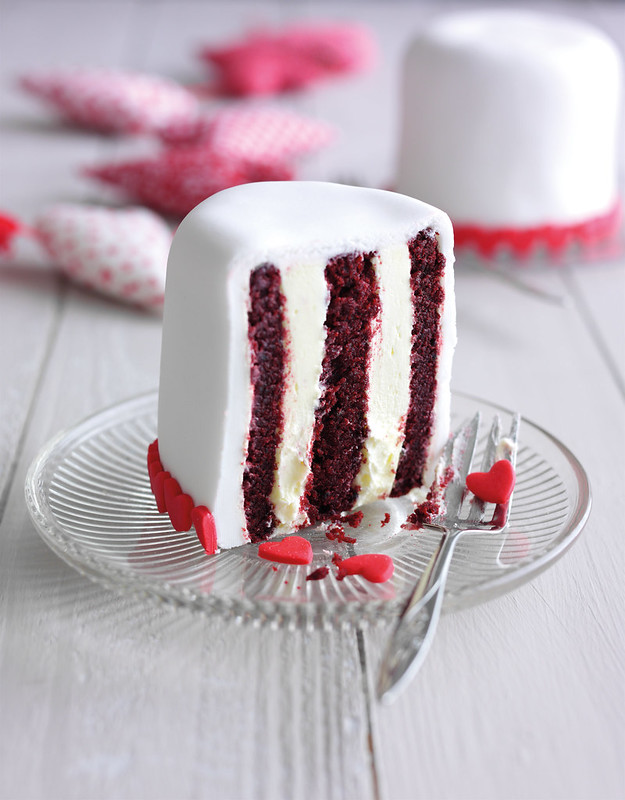
This is the perfect treat for a romantic dinner date. Red love hearts attached to the outer layer hint at what’s inside, and once cut, your loved one won’t be able to fathom how you achieved the vertical stripes! The pretty hearts are an addition inspired by my friend Davina.
Preparation Time: 45 minutes plus baking and chilling | Servings: 4
- 1 ¾ oz (50 g) red gumpaste
- Confectioner’s sugar, to dust
- ½ cup (4. oz/125 g) unsalted butter, softened
- ¾ cup (5. oz/150 g) superfine sugar
- 1 extra-large egg, at room temperature
- 1 ¼ cups (5 oz/140 g) allpurpose flour
- 1 tbsp unsweetened cocoa powder
- ½ tsp baking soda
- Pinch of salt
- ½ cup (4. fl oz/125 ml) buttermilk
- 1 tsp vanilla extract
- 1 tsp white wine vinegar
- 2 tsp red gel food coloring
- 2 tbsp water
- ½ x batch Classic Buttercream (see below)
- 1 lb 10 oz (750 g) white ready to use fondant
Procedures
Preheat oven to 350.F (180.C). Line a jellyroll pan that’s roughly 14 x 9 inches (35 Å~ 23 cm) with parchment paper.
Roll out the red gumpaste on a work surface dusted with confectioner’s sugar. Use a heart-shaped cutter that’s roughly ½ inch (1 cm) tall and wide to cut out 20–25 hearts. Set aside.
Fit the paddle attachment to a stand mixer. Set the mixer to a medium speed, then blend together butter and superfine sugar until the mixture is pale. Add the egg and mix it in thoroughly. Stop the mixer and scrape down the sides of the bowl.
In a medium-sized bowl, sift together the flour, cocoa powder, baking soda, and salt.
In a small jug, mix together the buttermilk, vanilla extract, and white wine vinegar.
Add half of the dry ingredients to the butter, sugar, and egg mixture in the bowl of the stand mixer and blend on a low speed. Once incorporated, add half of the buttermilk mixture. Once incorporated, scrape down the sides of the bowl and repeat, adding the rest of your dry and liquid ingredients to the bowl in the same way.
In a small jug, stir the red gel food coloring into the water, ensuring the gel is completely dissolved and that there are no lumps. Pour this into your mixture and blend in the color on a slow speed until it is evenly distributed throughout.
Spoon the colored mixture into the prepared pan, ensuring it reaches the corners. Bake for 20 minutes, until the center of the sponge bounces back when touched.
Dampen a dish towel with cold water and place it on top of the cake. Flip over the pan (use a dry dish towel to handle the jellyroll pan as this will be hot). Gently and slowly peel away the parchment paper. Tightly roll up the cake up, starting the roll along one of the longest edges, in the damp dish towel, then leave for at least 30 minutes to allow it to cool completely.
Carefully unroll the cake—it will be very moist so do this slowly, to avoid tearing the sponge, but don’t worry if it does tear, as the cake will still roll back into shape. Spread the buttercream across the top, starting from the middle and spreading outward until it reaches . inch (1 cm) from the edges. The cream should be approximately (5 mm) thick, which is roughly the same thickness as that of your cake. Now carefully reroll your cake.
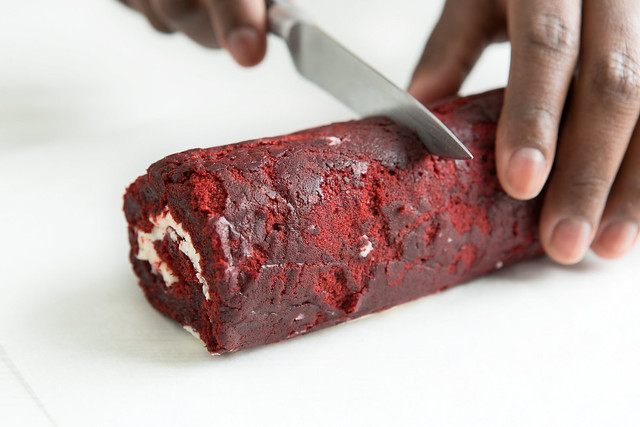
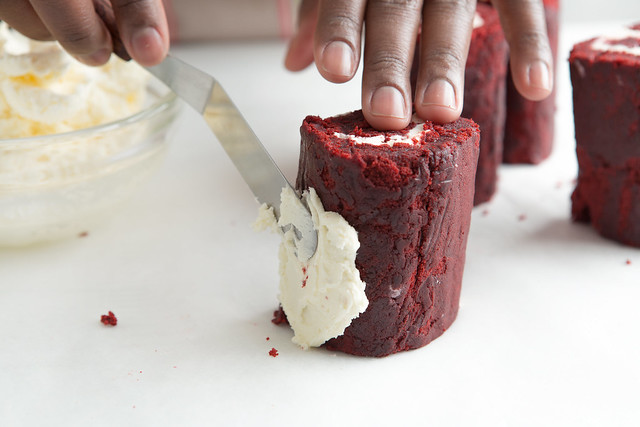
Slice your swiss roll into 4 equal pieces. Sit these upright on a plate and refrigerate for 30 minutes. Using an angled metal spatula, apply a thin crumb coat (see page 20) to your cake and refrigerate for 30 minutes.
Roll out the white fondant to a thickness of . inch (5 mm) on a work surface dusted with confectioner’s sugar. Make sure the surface area is large enough to cut out 3 large circles with which to cover your cakes. Cut out 1 circle, then remove 1 cake from the refrigerator and cover it with the fondant. Now set the cake in position on your presentation plate. Repeat with the remaining cakes.
Apply your hearts around the base of the cakes, using a dampened paintbrust to stick them in place. When serving, slice down the center of the cake for the best visual impact.
Classic Buttercream
Quick and simple and absolutely delicious, this buttercream continues to be a favorite frosting with bakers around the world. It is rich, sweet and firm, so it forms a nice base for fondant decoration, and is perfect for decorating cupcakes. This recipe can be easily adapted by choosing different flavors of extract, or cocoa powder for chocolate buttercream.
Preparation time: 10 minutes
Portion: Enough to fill and cover an 8-inch (20-cm) cake with 3 layers or top at least 12 cupcakes
3 ½ cups (1 lb 2 oz/500 g) confectioner’s sugar
1 cup (9 oz/250 g) unsalted butter, softened and cubed
1 tbsp milk
1 tsp vanilla extract
Gel food color (optional)
1. Pour the confectioner’s sugar into the bowl of a stand mixer fitted with a paddle attachment and set to medium speed. One by one, add the cubes of butter and allow them to be slowly mixed into the sugar. It may take a minute or two for the buttercream to begin to form, so be patient.
2. Once all the butter is incorporated, add the milk and continue to mix on a medium speed. Once the milk is incorporated, leave the mixer to continue blending the mixture on a high speed for about
5 minutes until the frosting is light and fluffy.
3. Add the vanilla extract (or another flavoring of your choice). If you are coloring the frosting, use gel food color. Reduce the stand mixer’s speed setting to slow and add small amounts at a time using a toothpick (allowing the stand mixer to blend the color for you) until you have the desired shade.


