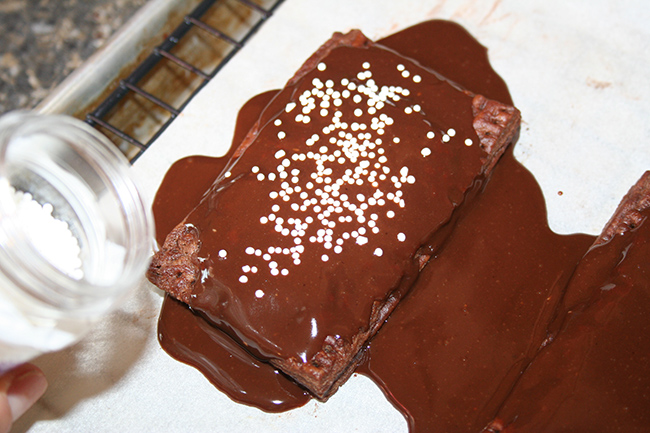
Homemade Chocolate Pop-Tarts

Let me tell you a story about how deeply, to-the-core evil, I am. It involves pop-tarts. 

OK, so when I was young, and it would have to have been before I was six, because this was before my little sister was born, my mom would, on occasion, take out a shiny two-pack of chocolate pop tarts. She would open it, and give one of the precious pop tarts to me, and the other to my older sister. 

Here's what I would do with that pop-tart. I would hold it in my hand while watching my sister eat hers. And only when she was just about done would I start eating mine. The entire reason for my doing this was to hold it over her. I didn't have many ways to exert power as the little sister who was more bookish than scrappy, so I held on to these little opportunities with all my might. 

Amazingly, I have no recollection of her ever shoving me and or grabbing my tart and running with it. I would have deserved it. 

I still have a lot of love for pop tarts, but I have no delusions about them being actual food. However, when you make your own toaster pastries, you can enjoy the nostalgia but actually up the flavor game. 

When I was assigned to make a chocolate pie crust for Craftsy, the recipe yielded two crusts. With one, I rolled it out in the traditional way and blind-baked it; it was the perfect shell to fill with a creamy chocolate filling.

But with the second crust, I rolled it out, cut it into rectangles, and made myself some choco pop tarts. 

Man, was this a good decision. BURSTING with chocolatey flavor, they satisfied my nostalgia, but tasted totally grown-up. And they delighted everyone who came into contact with them. I would say that I win! You can win, too. Here's the recipe. 


Chocolate Pop Tarts

Makes 6 pop tarts - printable version here

  • 1 portion chocolate pie dough (from this recipe
  • about 12 squares of dark chocolate (I used squares from Perugina dark chocolate bars)
  • 10 ounces dark chocolate, coarsely chopped 
  • 5 ounces heavy cream
  • White nonpareil sprinkles 

Preheat the oven to 400 degrees F. Line a baking sheet with parchment paper. 

Roll out the pie crust into a vaguely rectangle-like shape; standard or slightly thin pie crust thickness, about 1/8 inch thick (remember, you're stacking double portions to form the tarts). Cut out 12 equally sized rectangles. 

Oh, and if you have leftover bits of dough, don't toss it. Roll them up with some butter and sugar and cinnamon and make roly polies! Bake them in the oven while you bake the tarts.

Press 1 1/2 squares of dark chocolate in the center of each of the 6 rectangles.

Place a second rectangle on top, and crimp the edges to seal them, using the tines of a fork. Press the tines in the center of each tart to create a little escape valve for steam. By this point I had transferred the tarts to the lined baking sheet.

Place the tray in the oven; bake until the tarts are "set" - on the low end, 6 minutes, or longer depending on your oven. Just keep an eye on them. Once they have a dull finish on top and look toasty on the edges, remove from the oven.

Let them cool on the tray for a few minutes, then transfer to a wire rack. 

While they cool completely, make the topping. Place the chocolate in a heatproof bowl. Heat the cream to the simmering point. Pour the cream over the chocolate and mix until smooth. 

Spread/pour some of this ganache on top of the tarts.

I like to do this while they're on parchment over the wire rack because nothing will drip through; once that chocolate sets it is still delicious, even if messy. Immediately top with sprinkles (while the topping is still wet). Let the topping set for a while, then enjoy your tarts. 

Hoarding your tart until your companion has finished theirs = optional. 

Want more pop tarts? Here's a recipe for traditional pop-tarts, inspired by my friend Peabody.

What's your favorite pop-tart flavor?

Banana Buttercream

Can I tell you about this cool thing I did with a gross banana? 

OK, so I shouldn't have written that. As I looked back at it I immediately could see that it could be interpreted in very many wrong ways, but at the same time, it made me laugh, so I'm keeping it.

Anyhow, back to the gross banana. It's totally gross. It got this way because it was in my car and I forgot about it for 2 days. Sorry, banana.

Well, I had just recently made banana bread so I wanted to try something different, and found myself thinking: hey, could I make buttercream with a banana? 

Well, as fast as I could peel that awful thing I did and decided to see what would happen.

I started by discarding the yucky peel.

Then, I put my banana in my stand mixer. I added some sugar.

I added a bunch more. After about 3 cups I believed I had something here; after 6 cups, it was of a buttercream consistency.

It is thicker and more viscous than buttercream - I think that is the nature of the beast. But it worked! I topped some of my recently baked hot milk cake with it, and it was glorious. It was very sweet because quite a bit of sugar did have to be added, but tasty. I think with caramel, or with some salt, it would have been even better. 

But you know, I decided the fun should not in fact stop there. The buttercream sets firm, so I decided I should make use of it quickly. So I slightly chilled it in the fridge, then rolled it into little banana buttercream balls. Which I coated in rainbow sprinkles, because that is what one does, right? 

So, there you have it: banana buttercream is a thing, it's vegan, and it's here for you. Here's how you do it.

Banana buttercream

Makes about 2 cups 

  • 1 very ripe, almost gross, banana
  • 4-6 cups confectioners' sugar

(note: I didn't add vanilla or anything, but I think it's a good idea! I just forgot in my excitement over the experiment)

Combine the banana and 2 cups of confectioners' sugar in a stand mixer with the paddle attachment. Cream it together; as the sugar is absorbed, add more, 1 cup at a time, until it reaches a good spreading consistency. Stir in a teaspoon of vanilla or a little salt if you wanna. 

Use it on whatever cake or cookies you'd like! Enjoy! 

Psst! If you like this, you might enjoy this avocado cake recipe, which features avocado buttercream!

Have you ever made an "alternative" buttercream? 

Mini Grasshopper Brownie Pies

Ready for some festive holiday treats? Hop to! The kitchen, that is, to make these mini grasshopper pies.

It's hard to imagine a happier holiday dessert than these pint-sized pies. But--shh--I'll tell you a secret: they're not, strictly speaking, the result of a traditional Grasshopper pie recipe. I had a little help from my friends. And by friends, I mean Among Friends Baking Mixes

Among Friends is one of my favorite baking mix companies. As I mentioned in my other recent recipe featuring their products (double chocolate magic cookie bars OMG), I really appreciate their mixes, for a number of reasons. For one, the mixes are gluten-free. While I am a card-carrying member of the I Love Gluten Society, I have taken enough baked goods to group events only to have half the tray of cookies, cake, or pie or whatever uneaten because half of the group is gluten-free, so I appreciate a mix that will yield baked goods which are appropriate for a crowd. Second, there's nothing creepy in the ingredients: no GMO stuff, and the mixes are made with whole grains. 

OK, so back to these mini pies. I mixed up the Among Friends "Alec's Brownie Mix" according to the instructions, and baked 'em up in one of those jumbo cupcake tins (sometimes called "texas size", the ones that have the same volume as a 12 cup pan but only have 6 supersized vessels). Once baked, I pressed a well in the center of each brownie, in which I put a peppermint-scented cream cheese buttercream mixture. But, you know, that wasn't quite enough for me to call finished, so I topped 'em with melty chocolate and sprinkled them with crushed starlight mints. 

Listen, the finished results were absolutely delectable. Brownie + peppermint + cream cheese buttercream. What is not to love? 

 While these are "mini" as pies, they're actually pretty generously sized as desserts, so they're a good indulgent dessert, or if you're into sharing, they're good for that, too. 

Mini Grasshopper Pies

Makes 6 - printable version here

For the bases

  • 1 pouch Among Friends brownie mix
  • 3 eggs
  • 8 ounces unsalted butter, melted
  • 1 teaspoon peppermint extract

For the filling

  • 4 ounces (1/2 brick) cream cheese, softened
  • 2 cups confectioners' sugar 
  • 1 teaspoon peppermint extract 
  • green food coloring

To top

  • 2 ounces good quality chocolate, melted
  • crushed candy canes or starlight mints

Start by making the brownie bases. Generously grease a 6-cup "Texas" cupcake tin (you can also use a regular cupcake tin; you'll just need to watch the bake time as it may be slightly shorter). Preheat the oven to 325 degrees F. 

In a large bowl, combine the brownie mix, eggs, melted butter, and peppermint extract. Mix until cohesive.

Divide the mixture between the greased cupcake cups; they will be a bit less than halfway full. 

Bake for 15 minutes, or until "set" on top (I baked these at high altitude so it may be a slightly different bake time for you!). 

Remove from the oven, and while still warm, press the risen domes of the brownie-cakes down with a spoon, creating a well in the center of each "cup". With a knife, loosen the sides of the brownies. Let cool completely, then invert to release the brownies from the pan. 

In the bowl of a stand mixer fitted with the paddle attachment, cream the cream cheese until nice and smooth (no lumps!). Add in the sugar and peppermint extract; keep mixing on low, until niiiiiiice and creamy and smooth. Stir in a few drops of the green food coloring and mix until smooth.

OK, so here's where I like to keep things nice and clean. I lined each cup of the liner with plastic wrap and put the brownie bases BACK in the cups. Then, I scooped a nice spoonful of the filling mixture on top of each and spread it. Then, I put the whole tray in the freezer for about 45 minutes.

Remove the tray from the oven, and extract each little pie from the pan. Drizzle with melted chocolate and sprinkle with crushed starlight mints or crushed candy canes. Enjoy! 

Let's Make Lavash.

Let's make lavash. Wait, what's lavash? 

Lavash is a traditional Armenian flatbread made simply, using a handful of ingredients. It can be rolled very thin and served cracker-like, or rolled thicker for a more naan-like result. I got curious about making it for two reasons:

1. Because it's one of the recipes I've worked with on my Baking Steel book project.

2. Because I got some avocado oil in the mail and I wanted to try something out with it. 

As a side note: did you know that avocado oil is actually green? For some reason this surprised me. 

So, I made this lavash, and I have to tell you, I don't know why I haven't made it before. I rolled mine thick, so that it had a pillowy, naan-like texture. It is a little denser and more substantial than a pita bread, with a subtle sweetness and yes, a mellow avocado undertone from the avocado oil, which was sent to me by CalPure. I added a little bit of spice on top of mine (a purchased mix from Savory Spice shop called "Colorado Plateau Citrus Pepper", consisting of black pepper, garlic, orange peel, lemon peel, citric acid, onion, and Smoked sweet paprika) for a bit of added flavor, and it took the bread from tasty to totally tantalizing. 

OK, so take a chance on something new and try out lavash. You won't regret it!

Lavash

Makes about 20 pieces - printable version here

Ingredients

  • 120 grams (1 cup) all purpose flour
  • 1 grams (1/4 teaspoon) active dry yeast
  • 8 grams (2 teaspoons) sugar
  • 8 grams (2 teaspoons) salt
  • 72 grams warm water (about ⅓ cup)
  • 8 grams (2 teaspoons) avocado oil (can use olive or other oil here), plus more for brushing bread
  • Seeds or spices, to top
  • Salt to taste    

In a mixing bowl, combine flour, yeast, salt and sugar. Add in warm water and oil to mix until all incorporated.

Knead dough until smooth consistency, maybe adding water if it's too dry. Place in an oiled bowl, cover with a damp towel, and let rise for 1 hour.

Knock dough down and let rise again for 3 more hours.

Remove dough from container onto floured work surface. Roll out to about 1/8 to 1/4 inch thick (thinner if you want it more cracker-like). 

Cut dough sheets into random size pieces about 5-9 inches (about twice the size of tortilla chips). Brush one side with more avocado oil.

Heat up a skillet over medium-high heat. 

Toast, oil side down, for 1 minute or until golden brown. While first side is down, brush oil on the back side and sprinkle the spices on top, if using

Flip and toast on the second side, noting that it will take less time than the first side. Once done, transfer to a wire rack to cool. 

Continue with the remaining portions of dough. tore these, loosely wrapped, at room temperature for up to 3 days.

What's your favorite flatbread?

4 Ingredient Almond Butter Pomegranate Cookies (Gluten Free)

Peanut butter and jelly? Yawn. It's all about almond butter and pomegranate now.

Since when, you might be asking? Um, well, since I received the biggest shipment ever of pomegranates and pomegranates. It was a free shipment from POM Wonderful. I thought that they were going to send me, like, six pomegranates.

Nope--they sent me like 20, plus a ton of arils. Basically, Everything's all about pomegranate right now. By everything I mean every recipe, every housewarming gift I offer, every morsel that passes through my mouth: it somehow involves pomegranate. And it's been fairly pleasurable. I have used them in tacos, I have given them to professional photographers, I have written about how to cut and de-seed a pomegranate, I have eaten more pomegranate than I've ever eaten in my life. 

Oh, and I also made cookies. Not just any cookies. The easiest but best type of cookies: the type that come together in minutes, and the ingredients are really just things that you probably already have on hand anyway.

This is an adaptation of my 3-ingredient almond butter cookies from Craftsy. In this version, it's a little augmented: instead of just three ingredients, I've added an honorary fourth: pomegranate.

The arils look like little gems on top of the cookies, and they add a pleasing tart flavor to the rich-sweet almond butter cookies. 

It's a simple addition, but a good one. I vote that almond butter and pomegranate should be an Official Thing, starting right here and now. 

Go ahead! Give it a try. Oh, and if you're living la vida gluten-free, lucky you: these are naturally grain and gluten-free. They're really like little mini almond butter souffles. 

4 ingredient almond butter pomegranate cookies

Makes about sixteen 2" cookies

  • about 16 teaspoons of pomegranate arils 
  • ½ cup almond butter
  • 1 large egg, room temperature
  • 2 tablespoons sugar

Scatter the arils on a sheet of paper towel. Use a second paper towel to blot them dry. This will keep them clean and from making your cookies gummy.

Position a rack in the middle position of your oven, and preheat the oven to 300 F. Prepare a cookie sheet by lining it with parchment paper or a silicone mat. 

In a large bowl, combine all of the ingredients together. They will come together into a decidedly batter-like mixture: thick, but still quite soft. 

Spoon teaspoonfuls of batter on to your prepared baking sheet, with a little space around each cookie to accommodate some spreading. You can use the back of the spoon to smooth the batter into a more pleasing circle shape, but don't spread it too thin. 

Sprinkle a few arils on top of each cookie.

Bake for 6-8 minutes, or for as long as it takes for the cookies to appear "set". This can depend on your oven and your altitude. I baked this particular batch at high altitude so they took a little longer, but I am including the instructions I used for the almond butter cookies I baked in North Carolina. Just keep on checking them til they're done, ok? 

Remove from the oven; let the cookies cool on the sheet for a while before transferring the entire parchment sheet to a wire rack so they can cool completely. 

Enjoy!

Make Dish Washing Easier By Making Chocolate Milk

This is a public service announcement designed to save you time and gain you snacks.

In general I don't mind washing dishes. But I do mind washing a pan or the top of a double boiler after I've melted chocolate inside. It's messy, it takes forever to clean, and I lament the loss of that chocolate. 

But never again will I lament. Nor should you. Because this is an amazing solution that saves you much of the cleaning hassle, and gives you a tasty snack. 

Make chocolate milk. 

You heard me. Next time you have chocolate scum all over the bottom and sides of a pan or double boiler, simply do this:

1: Pour some milk (non dairy alternatives are fine) in the pan.

2: Heat it on low until the chocolate melts into the milk. Stir every now and again to keep it from sticking or scorching. Scrape the sides of the pan to get all that chocolate goodness melted into the milk.


3: Enjoy as hot chocolate, or put it in a jar and save it in the fridge for later as a rich, thick chocolate milk. 

Note: Do not share with your pug, even though he tells you he is STARVING. 

Enjoy the fact that your pan is now much cleaner, and much easier to clean. And enjoy your snack, too.

Cue the "the more you know" music!

Love, CakeSpy

Science: Meringues Made From Freaking Chickpea Water

Guess what I used to make these meringues? FREAKING CHICKPEA WATER. And sugar and vanilla. That's it.

I had heard that you could make magical things using chickpea water. I even featured such a recipe on this site, from a guest contributor.

So the other day, when making roasted garbanzo beans, I reserved the chickpea water to try something out for myself.

I wasn't sure what I wanted to make, so I put the water in the fridge and thought about it. A day passed and I forgot about it. On day two, I remembered and made a note on my to-do list: "EITHER FIGURE OUT WHAT TO DO WITH THE CHICKPEA WATER OR THROW IT OUT".

Now, I hate food waste, so that was motivation for me. I decided to find myself a recipe to utilize this freaking chickpea water.

This recipe looked simple and easy, and a good starting point, so I decided to give it a try.

I put the chickpea water (also known as "aquafaba" but I prefer "chickpea water") and some vanilla in a bowl, and started mixing.

I added some sugar in a slow, steady stream. I kept mixing.

I realized that i accidentally had put on the paddle attachment, not the whisk. Oops. I swtiched it, and kept on mixing.

I mixed this stuff for about 20 minutes, and at times, I thought nothing was going to happen. But then, after a bathroom break, vacuuming my house, and checking Facebook, it started to set. 

OMG - it freaking LOOKED like whipped egg whites, you guys! 

I tasted it. It tasted good. Normal. Not like a hummus byproduct. Honestly, sort of marshmallow-like.

I loaded the mixture into a bag and piped it on to a parchment-lined baking sheet. Pretty!

And I baked 'em up.

Well, I think I shouldn't have piped so decoratively nor should I have placed the meringues so close together, because this happened.

But in spite of appearances, the recipe wasn't ruined; I just cut apart the ones that were stuck together and enjoyed their new, decidedly boob-like, shape. 

They looked like meringues. Boob-like meringues, but still. 

They taste like meringues, with a slightly different aftertaste. But not bean-y. Just different. Sort of marshmallow-y, but without the chewiness, like sugary air. 

These are very nice meringues, and naturally gluten-free and vegan. So they're great if you have vegan or gf eaters you want to please. 

But mostly, do this for the magic. You'll feel like Mr. Wizard!

Chickpea water meringues

Makes about 20 - printable version here

  • Liquid strained from 1 can of chickpeas (15 ounces)
  • 1 teaspoon vanilla
  • 1/3 cup sugar

Preheat the oven to 200 degrees F.

Pour the liquid and vanilla into the bowl of a stand mixer fitted with the whisk attachment (I was so dopey, I mixed it for a few minutes with the paddle before I realized my mistake and switched!). 

With the mixer running, slowly pour in the sugar in a steady stream.

Whisk for a nice long while. It took me about 20 minutes to attain peaks on the mixture; during that time I prepped a baking sheet with a silicone liner. It took a while, but when they did "set", I was totally confounded. This LOOKED and felt like whipped egg whites. 

Load it up into a bag and pipe it on to your lined baking sheet. Leave space around each one. 

Bake anywhere from 1 hour to 2 hours, depending on the size and shape of your cookies. 

Have you ever baked with aquafaba (or as I call it, freaking chickpea water)?